|
Tips
und Tricks
|
TransposingA very usefull exercise for sightreading and playing from the ear is transposing melodies. Whenever I play a melody I do always try to play the same one octave higher or lower or in another key. Very often by this method I discover other possibilities to play the melody and make a better version. Sometimes it is more easy to use chords, sometimes it is even easier to play the melody. If you play the
melody higher
it is often necessary to use the higher positions. By this you will get
acquainted to the positions and learn to make use of it. In general it is also very easy to go up or down one string to play the melody a fifth higher or lower. Just try it out! |
| Bitte
teilen sie diese Seite: |
TremoloA good and smooth tremolo on the mandolin requires much practice. It is recommended to make use of special exercises to learn th tremolo. I
can recommend two exercises for learning the tremolo. Exercise for the movement of the right handThe first exercise should help to find the right movement of the right hand from the wrist. Lay your hand flat onto a table (and if necessary fix the position of the right arm with your left hand). Now move your hand alternating to the left and to the right, as far as possible. Make slow, big movements with your hand exploring the possible movement. Gradually accellerate this movement. The movement will become smaller when you accelerate. The aim of this exercise is to get a feeling of the right movement of the hand and wrist to exercise the muscles for this unusual movement of the hand. Later you should transform this movement to the movement with the pick.Speed and Control To be able to play a good tremolo you need to practice speed. A good way to gain speed it is to play exercises that combine short speedy passages with passages where you can relax. I used to practice a sequence of fast semiquavers (sixteenth notes) followed by a slow movement gliding on G, D and A-Strings with a final big upstroke on the A-string. I recommend to use a counted tremolo like it was recommended in many of the old methods. You will need different combinations of daown and up strokes depending on the musical situation. To practice this you should play groups of 4, 6 or 8 beats followed by a final down stroke, and also the same with a group of 3 beats at the end - leaving away just the last beat of a group of beats to make a short interception: 4 + 1 For some situations it is also necessary to end a group of beats with an up stroke: 4 + 2 EnduranceIf you have trained the speed you also need to practice for endurance. But if you have practiced the previous exercises you will already have gained some endurance and should be able to improve with real tremolo pieces. You can find some tremolo exercises on my free sheet music page More about the tremolo |
|
|
Positioning the BridgeThe right position of the bridge is very important for a clean intonaton of the mandolin. Nowadays with the aid of an electronic tuning device it should be not problem to position the bridge. Beginn with tuning the open string exactely. If you stop the string on the 12th fret you get the same note as the open string. Now you have to check this with an electronic tuning device. If the note is sharp, you have to increatse the length of the string by moving the bridge, if the note is flat compared to the open string you have to shorthen the string length. I recommend to check this with loosened strings, and check again after tuning your mandolin. When strings are tuned it is not recommended to move the bridge because of the strong pressure of the strings. I have collected information in detail and some links with very detailed and indepth instructions about the intonation on a separate page: intonation and positioning of the bridge and nut |
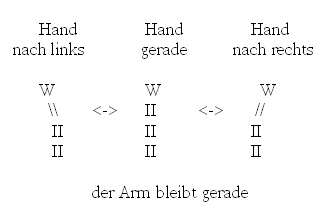
Picking the mandolin - Movement of the Wrist - Down Stroke and Up StrokeThe picking movement should be a movement from the wrist. A simple introductory exercise: ExerciseLay your forearm and hand onto a desk. You can use a book to raise your forarm a little bit, which produces an even more relaxt position of the hand. Now move your hand from the wrist to the left and to the right, and watch the hand move to the left and to the right. The forarm keeps straight, if you want you can hold it with your left hand to prevent it from moving. This movement is a bit unusual at the beginning, so this exercise is a way to practice the movement from the wrist. You can also make this exercise without a table. Just hold your right forearm with your left hand, and move your right hand from the wrist to the left and right.
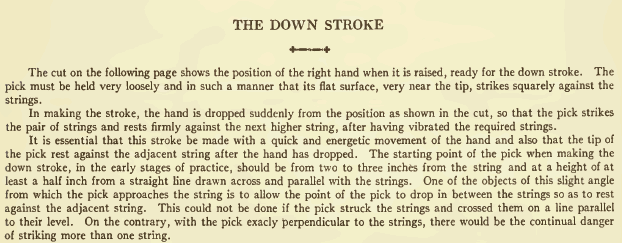
This movement will be used to play the mandolin. First picking exercisesMany of the old mandolin methods start from the beginning with the tremolo or the up- and down movement. I think this is a good way to lear the picking movement. If you just play downstrokes like in the modern German methods the hand has to do an up movement anyway between two down strokes. I think that it is important, that the movement of the hand is done in the right way from the beginning. Downstroke: The hand moves on straight line from a distance above the strings, diving through the plane of the strings in directon of the mandolin table. The pick hits a string and moves on until it is stopped by the next string. The taget of your movement shold be the stopping string, not the string that you actually play. After the picking movement tha hand should rest with its weight on the next string until it moves again for an upstroke or the next downstroke. Upstroke: The hand moves back on the same straight line, away from the mandolin table. While the hand moves up it will hit the lower string again, caused by the slanted movement only one string of the double strings is hit. The movement continues until it reaches the place for a new downstroke. In my opinion it is good to make large movements in the beginning. This will make it easier to control the right movement. And it will produce a loud and clear sound. As soon as you play faster the movements will get smaller. If you try to make small movements you will not be able to produce a loud and clear sound with your mandolin. The movement for the down- and upstrokes should be similar to what I described above. The movement should come from the wrist. In my opinion this straight movement up and down, along a slanted line, with a downstroke hitting (and resting) on the next string, and a big upstroke is the basic movement on the mandolin. You can find a detailed description of the movement in the first volume of the mandolin method by Zarh M. Bickford, which is available as a free download at the internet archive. Here are the most important descriptions from the Bickford Method:
In other words - from Paramount Method for Tenor Banjo by WM. Foden copyright 1922 (also available in the internet archive)
|
The Rest StrokeA discussion in German about the rest stroke. Link collection about mandolin picking technique and rest stroke The German mandolin technique as used by Magda Wilden-Hüsgen and her students is using the rest stroke as the main picking techique from the beginning. By using the rest stroke you can get the best tone. The pick glides over both strings and "rests" at the next string. The rest stroke is also used on the classical guitar as the most important technique. It is also called "apoyando" which is the spanish word for it. In den letzten Tagen habe ich einige Mails zum Thema Anschlag geschrieben und möchte diese Diskussion hier zusammenfassen - das dürfte für viele interessant sein: Frage: Werden prinzipiell beide Saiten eines Saitenpaares angeschlagen oder jeweils nur eine. Gerade bei schnellem Wechselschlag klingt es furchtbar, wenn ich beide Saiten eines Saitenpaares anschlage. Viel angenehmer klingt es in meinen Ohren, wenn ich jeweils nur eine Saite schlage. Außer beim Tremolo natürlich, der einzige Grund den ich mir für Doppelsaiten denken kann. Bei Bluegrass-Musikern glaube ich gesehen zu haben, dass sie nur eine Saite anschlagen, außer beim Tremolo und Strumming natürlich. Gibt es feste Regeln? Für klassische Musik sicher, aber wie sieht es bei den anderen Richtungen aus? Antwort: Danke für ihre Anfrage über meine Homepage MandoIsland. Ich versuche ihre Frage kurz zu beantworten:Die Doppelsaiten der Mandoline werden in der Regel auch beide angeschlagen, es gibt aber verschiedene Varianten. Normalerweise erfolgt der Anschlag etwas schräg zur Decke bzw. Saitenebene. Dabei trifft der Abschlag beide Saiten, der Aufschlag nur die obere der beiden Saiten (oben ist räumlich gesehen aber unten, dort wo die höheren Saiten sind). Bei diesem Anschlag muss die Hand keine Kurven machen, sondern kann sich auf einer geraden Linie hin und her bewegen. Das Plektrum muss so locker gehalten werden, dass es beim Anschlag nachgibt (ansonsten würde es die Bewegung abstoppen). Der Abschlag sollte im übrigen immer an die nächste Saite geführt werden, also nicht selbst bremsen, sondern die Bewegung an der nächsten Saite abstoppen lassen. Bestimmte Abschläge erfordern, dass die Bewegung an der nächsten Saite vorbei geführt wird, in diesem Fall macht die Hand eine bogenförmige Bewegung zur Decke hin und wieder weg und trifft die Saite beim Abschlag in einer Bewegung etwa parallel zur Decke, auch dabei werden beide Saiten getroffen (zumindest soll es so sein). Beim tremolo kann man die oben beschriebene schräge Bewegung machn (Abschlag zwei Saiten, Aufschlag eine Saite) oder aber parallel zur Decke anschlagen, sodass sowohl Ab- wie Aufschlag beide Saiten treffen. In diesem Fall können sowohl Abschlag als auch Aufschlag an die jeweilige Nachbarsaite anschlagen. Diese parallele Anschlagsbewegung ist vor allem natürlich erforderlich beim Tremolo über zwei oder mehr Saiten. Wenn es nicht gut klingt, dann liegt das am ehesten daran, dass die beiden Saiten nicht ganz genau übereinstimmen. Das Stimmen der Doppelsaiten erfordert deshalb etwas Übung. Wichtig ist beim Stimmen, dass man immer zuerst tiefer stimmt und die Saite dann langsam hoch stimmt, bis der richtige Ton erreicht ist. Die Saite sollte dabei ohne Widerstand über Steg und Sattel gleiten, sonst baut sich eine Überspannung auf, die sich dann beim Spielen wieder löst und damit die Saite wieder verstimmt. Wichtig ist auch, dass man immer beide Saiten bei den Doppelsaiten gleichzeitig wechselt und zwei identische Saiten verwendet, sonst ist es unmöglich beide Saiten gleich zu stimmen. Die Anschlagbewegungen sind sehr gut in der Schule von Bickford beschrieben (auf englisch), gibt es als ebook (Link irgendwo auf meiner Homepage). Lieber Herr Reichenbach! Vielen Dank für Ihre sehr hilfreichen Erläuterungen. Jetzt weiß ich zumindest, dass die beiden Saiten ihre Funktion haben und diese auch genutzt wird. Ab und Aufschlag sind dann aber doch irgendwie ungleichgewichtig. Einmal beide Saiten dann nur eine. Auf einem Video (amerikanischer Musiker), dass ich mir bestellt hatte, wurde jedoch immer nur eine Saite angeschlagen, in einem amerikanischen Buch jedoch, wurde wiederum immer von beidsaitigem Auf- und Abschlag gesprochen, es scheint da zumindest im amerikanischen Raum keine einheitliche zu geben. Vielleicht nimmt sich ja doch irgendwann einmal ein Profi dieses Problemes an. Ein Buch über die verschiedenen Techniken, wann und warum und wie sie angewendet werden scheint es nicht zu geben? Ich wäre sicher einer der ersten Kunden, die dieses Buch kaufen würden. Vielleicht ist es ja für Sie auch eine Anregung, zumindest für einen Artikel, der die Gilde der Mandolinenspieler mit Sicherheit sehr interessieren würde. Wenn Sie im Internet ( http://www.homespuntapes.com/ ) anklicken, haben Sie die Möglichkeit in ein paar Videos hineinzuschauen ... und dann verstehen Sie vielleicht auch meine Verunsicherung, denn hier scheinen die Musiker meist nur eine Saite anzuschlagen. Welche Videos haben sie den, bei welchem meinen sie, dass nur eine Saite angeschlagen wird? Ich habe Sam Bush und Chris Thile angesehen, dabei kann ich aber nicht nachvollziehen bzw. erkennen, dass nur eine Saite angeschlagen wird, ich denke eher, dass diese beiden den Anschlag bogenförmig und im Bereich der Saite parallel zur Decke spielen, sodass beide Saiten angeschlagen werden. Das Video von Chris Thile habe ich selbst und werde es mir bei Gelegenheit noch einmal ansehen, ich bin aber 100% sicher, das Chris Thile immer beide Saiten Anschlägt, es sei denn er will es anders. Prinzipiell gibt es - wie bei der Gitarre - einen freien Anschlag (an der nächsten Saite vorbei) und einen angelegten Anschlag (an die nächste Saite ran) - beides ist richtig, beides sollte man beherrschen. Je vielseitiger man ist, umso besser. Der angelegte Anschlag wird vor allem in Deutschland stark vertreten, hier gibt es die Schule von Marga Wilden-Hüsgen (Professorin für Mandoline in Köln/Aachen) - schauen sie mal bei ebay, dort wird sie ab und zu angeboten. Ich finde die Auswahl der Stücke und anderes nicht sehr gut, aber die Beschreibung der Anschlagstechnik ist sicher ausgezeichnet. Mit dem angelegten Abschlag über zwei Saiten erreicht man einen vollen, lauten und runden Ton wie er in Deutschalnd gewünscht ist, besonders für langsame Stellen. Mit dem freien Anschlag (+ andere Saiten + dünneres Plektrum + + + ) erreicht man einen helleren, obertonreicheren Ton. Für bestimmte Akkordzerlegungen ist der freie Anschlag ideal. Ein anderer amerikanische Spieler, Jesse McReynolds hat eine ganz andere Technik, bei ihm könnte ich mir eher vorstellen, dass er jeweils nur eine Saite anschlägt - aber an dieser Technik würde ich mich nicht orientieren, obwohl ich die Stücke von Jesse McReynolds und sein crosspicking mag - ich mache es aber ganz anders als er. Sie sehen, es gibt nicht die einzige Wahrheit - wie alle Dinge gibt es hunderte von Möglichkeiten. Vielen Dank Herr Reichenbach! Bei Steve James glaubte ich dies gesehen zu haben. Ist wohl auch egal, denn wie Sie schon sagten, es gibt auch hier nicht die eine Wahrheit. Auf jeden Fall wird auf all den Videos die ich mir angeschaut habe der freie Anschlag gespielt. |
Mandolin Setup - String ActionYour mandolin should have been setup in the best way to make it easy to play. This is valid for all kinds of mandolins - American A-models or F-models, Neapolitan bowlback mandolins or Brazilian bandolims. It is very important that the string action is setup properly. What's the recommended String-Action richtig?I have compiled some websites about recommended string action in the following link collection: The string action is measured at the 12th fret. The g-string need a higher string action as the e-string. The following actions are recommended:
You can check this simply with some coins. I have compiled the thicknesses of Euro and Dollar Coins. Euro Coins
Dollar Coins
This makes it easy to check your string action. Just take a 1 Dollar coin or 10 Euro Cent to check the distance of the G-string at the 12th fret. Take a 1 Cent or 1 Euro Cent coin to check the distance of the e string at the 12th fret. I have used a 1 Euro Coin and a 1 Euro Cent coin to measure the string action of some of my mandolins. You can see the pictures here: string action pictures with Euro coins Straight Neck?You can easily check the straightness of the neck when you press down the string at the highest fret. The neck relief should be very small.
|
Chords and Chord Charts for the MandolinThe mandolin is very good for playing chords and to accompany your singing. For the easy chords you can use the open strings, this is mainly used in folk and Celtic music. You can play many chords with just 2 fingers. I recommend to start playing chords from the beginning - the big movement of the hand leeds to a relaxed movement of the hand and makes it loose. The basic chords like G-major, C-major and D-major should be known by every mandolin player. In bluegrass music chords are typically played without open strings, for the bluegrass chop the fingers are loosened shortly after playing the chord to damp the sound. The mandolin tales the role of the drummer in a bluegrass band. Chords without open strings can be moved around - one chord pattern can thus be used for many differnent chords. I have collected the best links about mandolin chord charts in my link collection: Link collection about mandolin chords
|
Some tips about buying instruments (German) |
| Wenn sie diese Seite
ohne Navigationsleiste angezeigt bekommen, dann klicken sie hier um die MandoIsland Homepage zu öffen: |
 |